Skip to content

nodebb-user-level customisation : popover element

Solved Customisation
  • exactly my friend 🙂

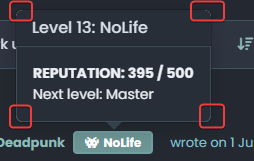
    same things for second screenshot

  • @DownPW This will work - obviously, modify to suit your needs

    .popover {
        border-radius: 0.375rem;
    }
    .popover-body {
        background: var(--bs-body-navbar) !important;
        color: var(--bs-body-color) !important;
        border: 1px solid var(--bs-border-color);
        border-radius: 0 0 0.375rem 0.375rem;
    }
    .popover-header {
        background-color: var(--bs-alert-info-bg);
        color: var(--bs-alert-info-color);
    }
    .bs-popover-auto[data-popper-placement^=top]>.popover-arrow::after, .bs-popover-top>.popover-arrow::after {
        border-top-color: var(--bs-border-color);
    }
    
  • @DownPW Try this

    .bs-popover-auto[data-popper-placement^=right]>.popover-arrow::after, .bs-popover-end>.popover-arrow::after {
        border-right-color: var(--bs-border-color);
    }
    

    It’s important to remember that JS will determine the popup position and then add the arrow to suit. In this case, you’d need the below CSS to capture all of them

    .bs-popover-auto[data-popper-placement^=top]>.popover-arrow::after, .bs-popover-top>.popover-arrow::after,{
        border-top-color: var(--bs-border-color);
    }
    .bs-popover-auto[data-popper-placement^=top]>.popover-arrow::after, .bs-popover-bottom>.popover-arrow::after,{
        border-bottom-color: var(--bs-border-color);
    }
    .bs-popover-auto[data-popper-placement^=left]>.popover-arrow::after, .bs-popover-end>.popover-arrow::after {
        border-left-color: var(--bs-border-color);
    }
    .bs-popover-auto[data-popper-placement^=right]>.popover-arrow::after, .bs-popover-end>.popover-arrow::after {
        border-right-color: var(--bs-border-color);
    }
    
    
  • phenomlabundefined phenomlab has marked this topic as solved on
  • better result than me but did you see this ?
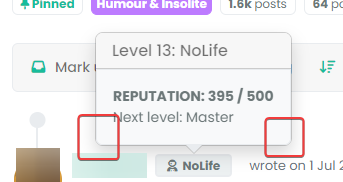
    • The border radius is much larger than the original
    • On light theme, seems border was blurry

    image.png

    image.png

    • And in addition of blur, on dark/mid theme, we have 2 border with haven’t radius. Don’t know why

    image.png

    image.png

    –> I have the same behavior with my code when I have tested

  • @DownPW Ooops…

    Sorry - I forgot a class - original answer modified

    .popover {
        border-radius: 0.375rem;
    }
    
  • hmmm nope it doesn’t change anything

    see it’s worse ^^
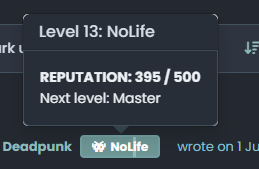
    204f26de-7ac7-4b29-bdb3-edcb9b65a73d-image.png
    205f5e14-f3f5-4cd0-b68b-e35b2d9052b4-image.png

    –> I have the same behavior with my code last night 😞

    EDIT:

    I f you play with border-radius you better seen the bug
    There missing something

  • @DownPW This isn’t as simple as it looks, because bootstrap is using inset border radius

    Here’s a workaround

    .popover-body {
        background: var(--bs-body-bg) !important;
        color: var(--bs-body-color) !important;
        border: 1px solid var(--bs-border-color);
        border-radius: 0 0 0.375rem 0.375rem;
        margin: 0px;
    }
    .popover-header {
        background-color: var(--bs-alert-info-bg);
        color: var(--bs-alert-info-color);
        border-top-left-radius: 0.375rem;
        border-top-right-radius: 0.375rem;
        margin: 0px;
    }
    .bs-popover-auto[data-popper-placement^=top]>.popover-arrow::after, .bs-popover-top>.popover-arrow::after,{
        border-top-color: var(--bs-border-color);
    }
    .bs-popover-auto[data-popper-placement^=top]>.popover-arrow::after, .bs-popover-bottom>.popover-arrow::after,{
        border-bottom-color: var(--bs-border-color);
    }
    .bs-popover-auto[data-popper-placement^=left]>.popover-arrow::after, .bs-popover-end>.popover-arrow::after {
        border-left-color: var(--bs-border-color);
    }
    .bs-popover-auto[data-popper-placement^=right]>.popover-arrow::after, .bs-popover-end>.popover-arrow::after {
        border-right-color: var(--bs-border-color);
    }
    

    Then, in the widgets section - /admin/extend/widgets select the account/profile.tpl widget, and add the below HTML

    <style>
    .popover-body {
        border-radius: 0.375rem;
    }
    </style>
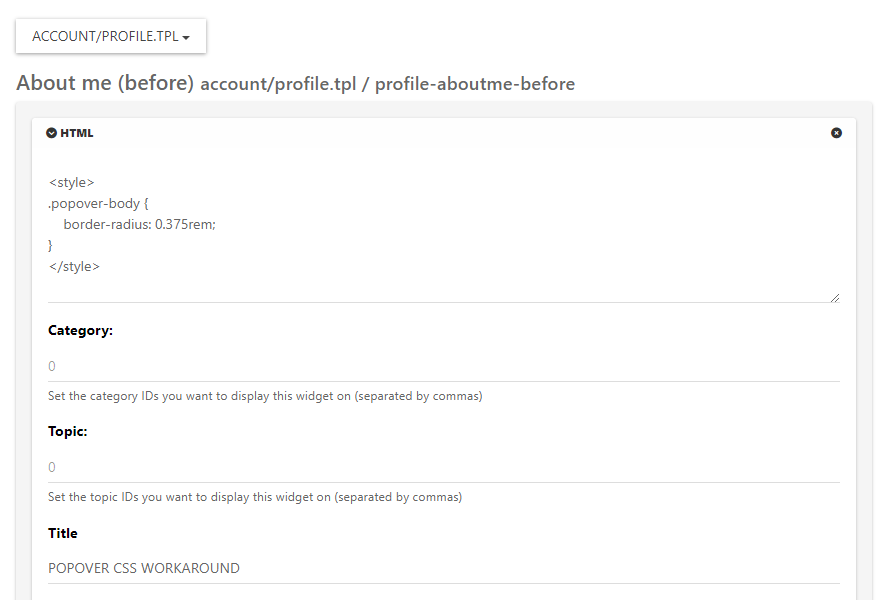
    

    32d9fac7-67b1-4ea2-9aa5-37eba0ab776e-image.png

    Save the widget.

    This is the closest you can get unfortunately. It’s something of a hack, but a necessary evil.

  • phenomlabundefined phenomlab has marked this topic as solved on
  • @phenomlab said in nodebb-user-level customisation : popover element:

    @DownPW This isn’t as simple as it looks, because bootstrap is using inset border radius

    yes, that’s what I noticed !! 😊
    Thank you baris ^^

    Hence the need to open this topic

    This hack seems to work, thanks again. If there is anything I will come back 🙂

  • @DownPW said in nodebb-user-level customisation : popover element:

    Thank you baris ^^

    Not his fault really - it’s the BS library behaviour by default.

  • No no, I said that in the sense that he told me it was simple ^^
    I was able to see that this was not the case by targeting the elements he had advised me.

  • phenomlabundefined phenomlab referenced this topic on

Did this solution help you?
Did you find the suggested solution useful? Why not buy me a coffee? It's a nice gesture, and a great way to show your appreciation 💗

  • 1 Votes
    2 Posts
    262 Views

    @Sala This should look better

    .sidenav .navbar-brand { padding-top: 0.5rem; padding-bottom: 0.5rem; }

    e5cec20e-be36-4ee8-9129-fd11ad4656ac-image.png

    You can increase the top and bottom padding by increasing the values above.

  • 0 Votes
    4 Posts
    526 Views

    @cagatay You’d target the body tag and use the below line of CSS

    background: url(/assets/customcss/backgrounds/default/default.png) no-repeat center center fixed;

    Obviously, you need to change the path to suit where your image is being stored.

    More info around the background property can be found here

    https://www.w3schools.com/cssref/css3_pr_background.php

  • 9 Votes
    32 Posts
    2k Views

    @DownPW said in Bottom footer navbar button extend:

    Oh my god, it’s beautiful mark

    I liked this design so much, I’ve implemented it here. I intend to do a lot more with the footer in due course, so hiding it makes a lot of sense. Thanks @DownPW for the idea and initial concept ♥

  • 1 Votes
    1 Posts
    178 Views
    No one has replied
  • 5 Votes
    9 Posts
    2k Views

    @phenomlab

    Very very great Mark 😉
    Thanks again, It’s perfect now !

    –> I share my code that I modified.

    I’ve added French and English comments.
    If you see things to change Mark, don’t hesitate.

    As usual, all the access paths (FA icons, logo) will have to be modified according to your architecture.

    You can also very well add/remove time slots and change welcome messages to suit your needs.

    Widgets ACP/HTML Widget Footer Logo <center> <br><br> <img id="thislogo" src="path/to/my/image"> </center> Widget Welcome Message <!-- IF loggedIn --> <div class="getUsername">, <a href="/me"><span class="username"></span></a></div> <!-- ENDIF loggedIn --> CSS

    – I added the size font-weight: 900; in the CSS because otherwise some FA icon wasn’t displayed correctly and reduce margin :

    i#thisicon { font-family: "Font Awesome 5 Free"; font-style: normal; margin-right: 8px; font-weight: 900; } .getUsername { padding-top: 20px; text-align: right; } /*Smartphone*/ /*On désactive le message de bienvenue"*/ /*We disable the welcome message"*/ @media all and (max-width: 1024px) { .getUsername { display: none; } } JAVASCRIPT // ------------------------------------------ // Welcome Message avec icône et Footer logo // Welcome Message with icon and Footer logo // ------------------------------------------ $(window).on('action:ajaxify.end', function (data) { //On récupère le username dans le DOM et on l'affiche //We retrieve the username from the DOM and display it function updateUsername() { $('.getUsername .username').text(app.user.username); } if (document.readyState === 'loading') { document.addEventListener('DOMContentLoaded', updateUsername); } else { updateUsername(); } //On déclare les variables principales (themessage & thehours) ainsi que les variables secondaires correspondants aux plages horaires //We declare the main variables (themessage & thehours) as well as the secondary variables corresponding to the time slots var thehours = new Date().getHours(); var themessage; var wakeup = ('Good day'); var morning = ('Good morning'); var lunch = ('Bon appétit'); var afternoon = ('Good afternoon'); var drink = ('Cheers'); var evening = ('Good evening'); var night = ('Good night'); var welcome = ('Welcome'); var matched = false; //On peux ici tester le résultat du code en spécifiant une heure (!!!IMPORTANT: Commenter une fois le script testé!!!) //Here we can test the result of the code by specifying a time (!!!IMPORTANT: Comment once the script has been tested!!!) //thehours = 20 //On déclare les plages horaires avec les icones FA et les logos //We declare the time slots with FA icons and logos path if (thehours >= 0 && thehours < 6) { themessage = night; theicon = "fa-solid fa-moon"; thelogo = "/assets/customlogo/XXX.png"; } else if (thehours >= 6 && thehours < 8) { themessage = wakeup; theicon = "fa-solid fa-mug-hot"; thelogo = "/assets/customlogo/XXX.png"; } else if (thehours >= 8 && thehours < 12) { themessage = morning; theicon = "fa-solid fa-sun"; thelogo = "/assets/customlogo/XXX.png"; } else if (thehours >= 12 && thehours < 13) { themessage = lunch; theicon = "fas fa-hamburger"; thelogo = "/assets/customlogo/XXX.png"; } else if (thehours >= 13 && thehours < 16) { themessage = afternoon; theicon = "fa-solid fa-sun"; thelogo = "/assets/customlogo/XXX.png"; } else if (thehours >= 16 && thehours < 18) { themessage = welcome; theicon = "fa-solid fa-rocket"; thelogo = "/assets/customlogo/XXX.png"; } else if (thehours >= 18 && thehours < 19) { themessage = drink; theicon = "fa-solid fa-wine-glass"; thelogo = "/assets/customlogo/XXX.png"; } else if (thehours >= 19 && thehours < 20) { themessage = lunch; theicon = "fas fa-pizza-slice"; thelogo = "/assets/customlogo/XXX.png"; } else if (thehours >= 20 && thehours < 24) { themessage = evening; theicon = "fa-solid fa-tv"; thelogo = "/assets/customlogo/XXX.png"; } // Si la page active est un topic, on désactive/cache le message de bienvenue // If the active page is a topic, we deactivate/hide the welcome message if (window.location.href.indexOf("topic") > -1) { console.log("This is a topic, so hide the user welcome message"); $('#thisuser').hide(); } // Sinon, on affiche le message en fonction, l'icone FA et son emplacement (prepend) // Otherwise, we display the message in function, the FA icon and its location (prepend) else { $('.getUsername').prepend("<i id='thisicon' class='" + theicon + "'></i>" + themessage); $("#thislogo").attr("src", thelogo); //$('.getUsername').prepend("<img id='thisicon' src='" + thelogo + "'></>" + themessage); } });
  • 38 Votes
    193 Posts
    29k Views

    OMG make sense

    Thanks dude 🙂

  • [NODEBB] Stats

    Unsolved Customisation
    20
    2 Votes
    20 Posts
    1k Views

    @phenomlab said in [NODEBB] Stats:

    @jac or I land up fixing it 🙂

    I wouldn’t put it past you 😛

  • 1 Votes
    6 Posts
    976 Views

    @jac said in [NodeBB] custom Gravatar image not showing:

    @phenomlab said in [NodeBB] custom Gravatar image not showing:

    @jac are you using Custom ?

    Sure am mate 👍🏻

    Confirmed Fixed