
I just wanted to ask because I don’t have much knowledge about the new installation.
Thank you for the explanatory answer.
[NODEBB] Help for my custom CSS
Solved
Customisation
-
@DownPW might be a bit greedy, but try this
$(document).ready(function() { $(window).on('action:ajaxify.end', function(data) { $(this).find($(".fa")).removeClass('fa-nbb-none').addClass('fa-commenting-o'); }); }); -
JS code seems not working but…
I see on ACP, the image of category is uploaded to imgur :
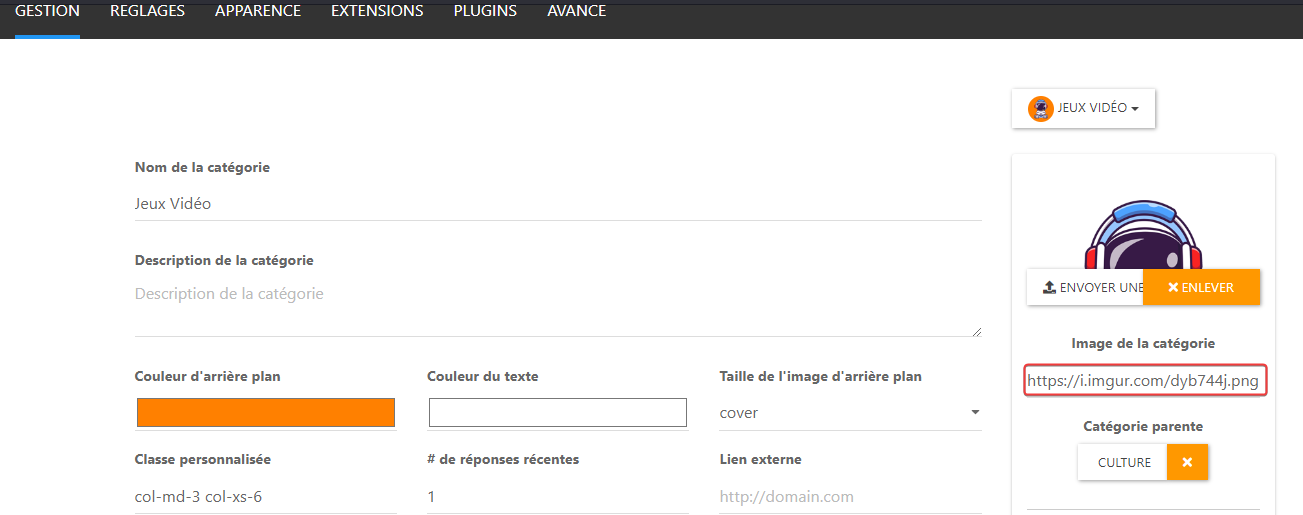
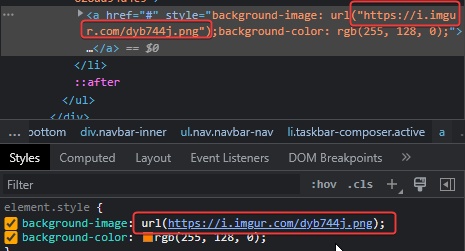
and I see this on dev console :

The url seems to not be encoded correctly, I don’t know why ???
If I change manually the URL in the dev console, it’s OK:
-
@DownPW said in [NODEBB] Help for my custom CSS:
The url seems to not be encoded correctly, I don’t know why ???
Yes, that certainly seems the case. I think you need to take this issue up with the plugin developer.
-
the trick is to know which plugin is in question!!
-
@DownPW sorry. I meant the
imgurplugin author -
hmmm I don’t thinks so because I have the same problem on NO PRODUCTION VM and I have this bug too without nodebb-imgur-plugin.
I have test with a local url in public nodebb folder and it’s the same too
I test to desactivate all plugin one by one for see at the moment
-
@DownPW let me know when your development server is available tomorrow and I’ll take a look at that code I provided previously
-
no problem I’m at home tomorrow all the day
I’ll let you know if I find
-
I think it’s a nodebb issue, because with only one plugin and one theme activate :
- nodebb-plugin-composer-default@9.1.0 (installed, enabled)
- nodebb-theme-persona@12.1.1 (installed, enabled)
Custom CSS, custom JS, custom Header and all custom widgets are disable…
Result it’s the same, I have this bug.
On your dev system, can you test to add a logo for a catégorie, delete the icon and test a new topic in this category ?
I think you will have the same result.
Let me know if you test too !
-
@DownPW did you delete the icon ? I’m wondering if this creates an orphaned reference to an icon which of course can’t be read.
-
yes off course I delete it
because if Idon’t delete the icon, she appears on bubble")
Open issue here:
https://github.com/NodeBB/NodeBB/issues/10896
If I not delete icon, she’s appear but not the image :

-
The issue is closed @phenomlab
It’s a nodebb bug. Fixed in 2.5.3 milestone
")
-
@DownPW Yes, I saw that. Caused by regression from what I see.
Thanks
-
@DownPW said in [NODEBB] Help for my custom CSS:
JS code seems not working but…
Sorry, that should have been something like this (obviously modify the source and replacement)
$(document).ready(function() { $(window).on('action:ajaxify.end', function(data) { $(".row").find($(".fa")).removeClass('fa-fw fa-comments-o').addClass('fa-check-to-slot'); }); }); -
hi @phenomlab
on v2.x , I have user online widget in my home page and I can center the widget like this :

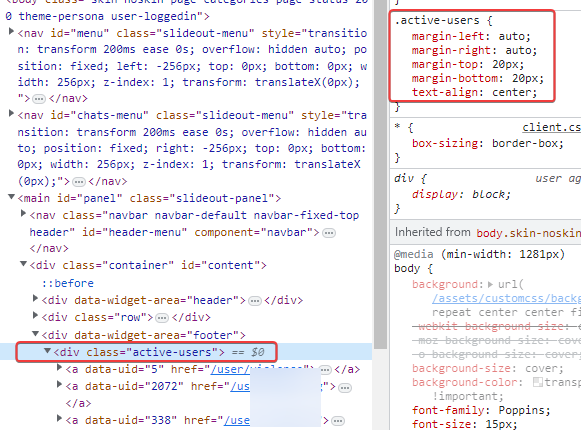
because we have a div by default on the widget
I can’t do the same on v3.x
Any idea how to get the same result ?
Thanks Dude
-
@DownPW I’d give the widget itself an
idand then add customcssto that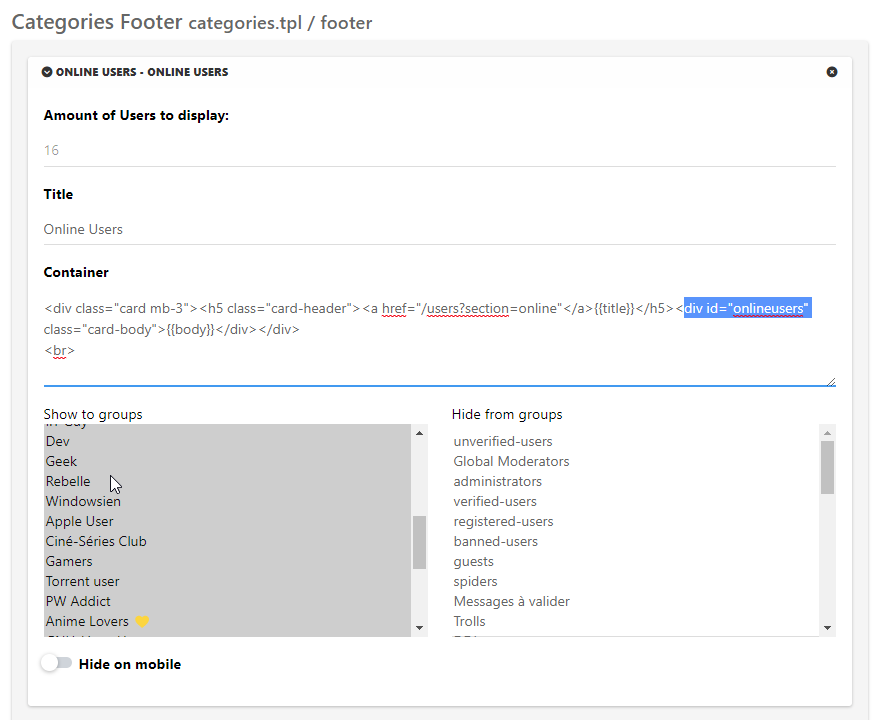
div#onlineusers {
    left: 0;
    right: 0;
    margin: 0 auto;
    position: relative;
}
-
Yep, it’s a good idea thanks to you but I’d like to display it without div card-header and body like the first screen
-
@DownPW In that case, change the
containercode to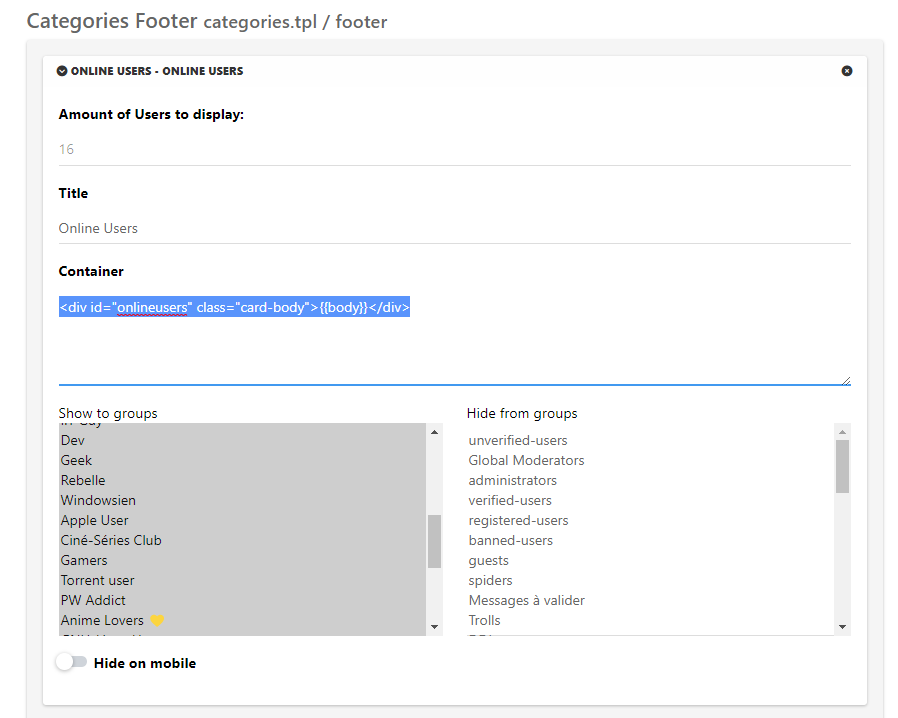
<div id="onlineusers">{{body}}</div>And same CSS class
div#onlineusers {
    justify-content: center;
    display: flex;
}
Then add
paddingandmarginto suit -
Perfect my friend
-
Hello mark
I wanted for test purposes, to put the welcome message in the Brand menu in the header widget.
I commented in the footer widget the corresponding code then I added it in my brand header widget:
<span id="thisuser" class="getUsername">, <a href="/me"><span class="username">DownPW</span></a></span>I commented out the old CSS to add the new:
/* Welcome Message Username on Header */
span#thisuser {
     margin-top: 0.7rem;
     margin-left: 2px;
     margin-right:-2px;
     font-size: .875rem;
     line-height: 1.4rem;
     font-weight: 500;
}
So far everything is fine, the result is correct :

But as soon as I select links in the left sidebar (home, recent, etc …), the message is added and displayed as many times as I select a link .
Did I miss something or do you have an idea to solve this bug?
Thanks my friend