Skip to content

Material View Support for Stock NodeBB

Unsolved Let's Build It
  • It seems that the CSS class is added but that it does not work correctly when declared in the ACP.

    I wonder if we should not remove the resolution story and have the code applied regardless of the resolution used because Material mode can very well be used on Smartphones.

  • @DownPW On reviewing the screenshots again, this seems to be only an adjustment for the overall container width?

  • just background color, border etc…
    You have CSS I used for this result above in the topic

    but anyway, my code is not correct.

  • @DownPW It doesn’t work because you haven’t defined anything here 🙂

                    // Toggle CSS rules when the button is turned on or off
                    if (isChecked) {
                        console.log('Material Thread view is active.');
                        // Apply your CSS rules here
                    } else {
                        console.log('Material Thread view is inactive.');
                        // Remove the CSS rules here
                    }
    

    This is how I do it for the threads

    https://github.com/phenomlab/nodebb-harmony-chat-threading/blob/0cea943c2e7ab0f63d2b2eae38d64bc19b8242ec/functions.js#L22-L32

    Your CSS also needs to be more explicit. For example

    [component="category/topic"], [component="categories/category"] {
        margin-bottom: var(--bs-post-category-topic-margin);
        margin-bottom: 20px;
    }
    

    Would become

    [component="category/topic"].material, [component="categories/category"].material {
        margin-bottom: var(--bs-post-category-topic-margin);
        margin-bottom: 20px;
    }
    
  • I remenber I have already test this without good result.

    Maybe retest

  • @DownPW Did you review the classes as I mentioned?

  • @phenomlab said in Material View Support foir Stock NodeBB:

    @DownPW Did you review the classes as I mentioned?

    yes but added the wrong class name, it’s better now.

    I’m here at the moment.

    JS :

    // ------------------------------------------
    // material View Mode
    // ------------------------------------------
    
    function material() {
        $(document).ready(function () {
            // Check if the screen width is 460px or more
            if ($(window).width() >= 460) {
                // Check if the custom thread view button already exists
                if ($('#materialThreadViewButton').length === 0) {
                    // Create the button for custom thread view mode with custom IDs
                    var threadViewButton = $('<div class="material-threads-wrapper"><form class="form"><div class="form-check form-switch material-threads-wrapper"> \
                        <input class="form-check-input" id="materialThreadViewButton" type="checkbox" data-field="materialThreadView"> \
                        <label class=" d-none d-md-inline fw-semibold" for="materialThreadViewButton"></label> \
                    </div></form></div>');
                    
                    // Append the button to the right sidebar
                    $('[component="sidebar/right"]').append(threadViewButton);
                }
                
                // Check if there's a stored state for the checkbox and update it
                var storedState = localStorage.getItem('materialThreadViewState');
                if (storedState === 'true') {
                    $('#materialThreadViewButton').prop('checked', true);
                }
                
                // Toggle the class 'material' on or off when the checkbox changes state
                $('#materialThreadViewButton').on('change', function () {
                    var isChecked = $(this).is(':checked');
                    var theTooltip = isChecked ? "Material Thread View Off" : "Material Thread View On"; // Update tooltip message
                    
                    // Toggle CSS rules when the button is turned on or off
                    if (isChecked) {
                        console.log('Material Thread view is active.');
                        // Apply your CSS rules here
                        $('[component=post]').addClass('material'); 
                        $('[component="category/topic"]').addClass('material'); 
                        $('[component="categories/category"]').addClass('material');
                    } else {
                        console.log('Material Thread view is inactive.');
                        // Remove the CSS rules here
                        $$('[component=post]').removeClass('material');
                        $('[component="category/topic"]').removeClass('material');
                        $('[component="categories/category"]').removeClass('material');
                    }
                    
                    // Store the checkbox state in localStorage
                    localStorage.setItem('materialThreadViewState', isChecked);
                    
                    // Update the tooltip title
                    $(this).attr('data-original-title', theTooltip).tooltip('dispose').tooltip({
                        placement: 'bottom',
                        title: theTooltip,
                        trigger: 'hover'
                    });
                });
    
                // Check for changes in the checkbox state when the page loads
                $('#materialThreadViewButton').trigger('change');
            }
        });
    }
    
    // Attach the material function to relevant events
    $(window).on('action:ajaxify.end', function (data) {
        material();
    });
    
    $(window).on('action:posts.edited', function (data) {
        material();
    });
    
    $(window).on('action:posts.loaded', function (data) {
        material();
    });
    

    CSS :

    .material-threads-wrapper {
        display: flex;
        left: 5px !important;
        position: relative !important;
    }
    
    @media (min-width:460px) {
    
    [component=post].material, [component="category/topic"].material, [component="categories/category"].material { 
        background: #F7F7F7 !important;
        border-radius: 0.375rem;
        margin-bottom: 20px;
        padding-left: 20px;
        border: 1px solid var(--bs-border-color);
    }
    
    }
    

    – There are quite a few things left, for example:

    • if we scan the recent or unread ones, the rest is not in the background :

    f3fe08cf-fbc1-4f47-8497-866557c4ec25-image.png

    • And the block + timeline in the topics :
      35beb3bc-8871-4689-b31c-cd2c489907a4-image.png

    I would also like to change the button which is not suitable for a vertical display

    For the moment, I haven’t found for all of that but I’m looking for.

  • better with video :

    blink3.gif

  • @DownPW You’re missing a hook 🙂

    I’ve added this

    $(window).on('action:topics.loaded', function (data) {
        material();
    });


    Works now !

  • @DownPW said in Material View Support foir Stock NodeBB:

    I would also like to change the button which is not suitable for a vertical display

    You could rotate it?

    .material-threads-wrapper {
        display: flex;
        left: 5px !important;
        position: relative !important;
        transform: rotate(45deg);
        margin-left: -2px;
        margin-top: 5px;
    }
    

    fc9f46cc-2235-47fe-a613-3baa9d5aa436-image.png

  • @DownPW could you pls share updated and enclosed codes for css and js?

  • @cagatay The code is not mature yet. There is still work to be done and phenomlab will have to validate it because I am not a developer

    @phenomlab said in Material View Support foir Stock NodeBB:

    You could rotate it?

    yep sure it’s better 🙂
    but I was thinking of a 2-state radio button like the form-switch because I believe Bootstrap offers it if I don’t say bullsh*t.

  • @DownPW said in Material View Support foir Stock NodeBB:

    but I was thinking of a 2-state radio button like the form-switch because I believe Bootstrap offers it if I don’t say bullsh*t.

    Something like this?

    https://jsfiddle.net/milanandfriends/p9AaY/

  • yes maybe, I had thought about that but just one button not two but why not :

    image.png

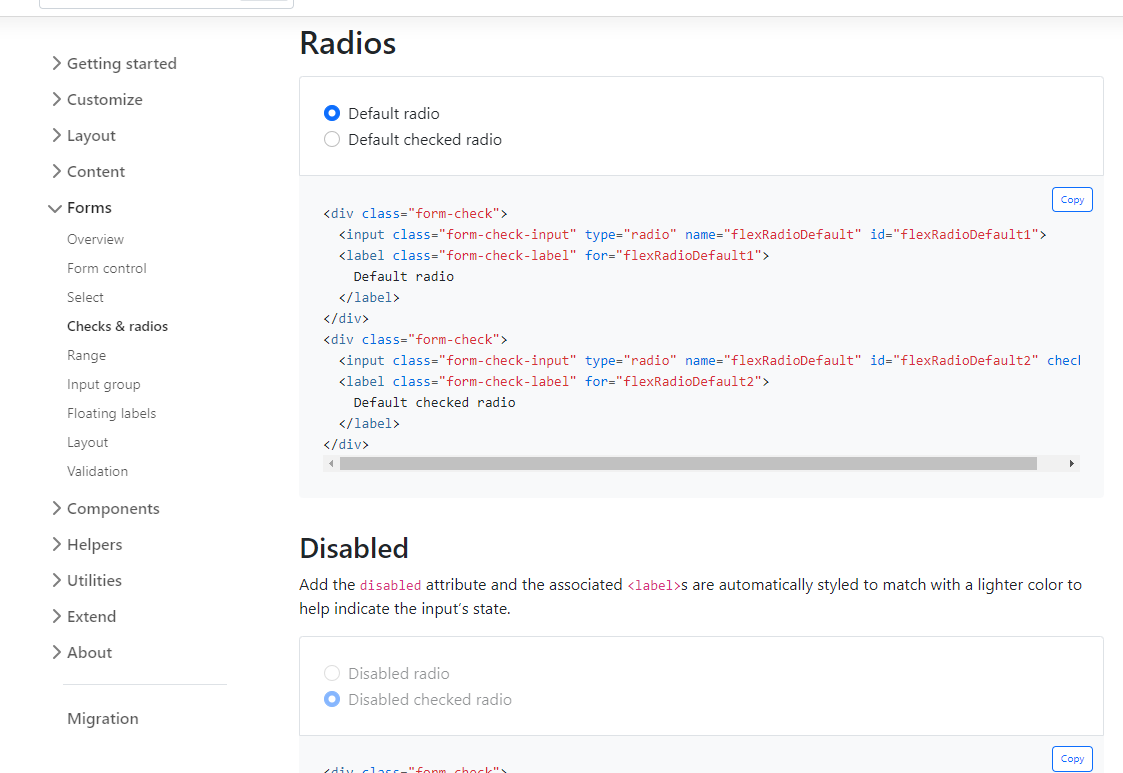
    https://getbootstrap.com/docs/5.0/forms/checks-radios/

    I’m not closed off I’m trying to see what could be better.

  • see this @phenomlab

    the element is perfect regardless of the mode engaged but a refresh does not replace it correctly.
    A missing hook?

  • @DownPW No. More likely a CSS class is not being applied on load.

  • hmm that doesn’t help me much 🙂

  • @DownPW Add this to your existing css class of

    .page-topic .topic .posts.timeline [component="topic/event"].timeline-event, .page-topic .topic .posts.timeline [component="topic/necro-post"].timeline-event
    
        margin-left: 52px;
    

    So you land up with

    .page-topic .topic .posts.timeline [component="topic/event"].timeline-event, .page-topic .topic .posts.timeline [component="topic/necro-post"].timeline-event {
        margin-bottom: 10px;
        margin-left: 52px;
    }
    

    That will fix it.

  • no it’s worse 🙂

    Maybe, the best would be to add a .material class but I can’t do it at the moment

  • @DownPW I remember this same issue now when I came across it whilst writing the threaded function. The problem here is that [component="topic/necro-post"] actually isn’t present in the DOM on page load, but added afterwards. This is why once the page has loaded, you can target the element with the toggle switch because it is in the DOM at the time. Because the this specific element is loaded afterwards, you cannot target it if it doesn’t exist.

    This effectively means you cannot add a class to an element that is not there. To work around this, you’d either have to wait for the page to load, add the necro element, then target it.

    Or, use the CSS I provided, and then “counter” it using other CSS when the class is removed. This is what I do in thwe threaded function.

    Raised this as an issue here

    https://community.nodebb.org/topic/17590/necro-function-dom-changes

    EDIT - should work now 🙂

    I’ve added a loop in your material function that looks specifically for the necro post

    $('[component="topic/necro-post"]').each(function () {
         // Add the 'material' class to matching elements
         if ($(this).hasClass('timeline-event')) {
         $(this).addClass('material');
         }
     });
    

    And also (on the advice of Baris) added a new hook as below

    $(window).on('action:topic.loaded', function (data) {
        material();
    });
    

    There are two separate hooks that look very much the same, but do different things (one has an “s” at the end, whilst the other doesn’t - “action:topic.loaded” and “action:topics.loaded”

    Now it works as intended 🙂


  • 5 Votes
    3 Posts
    246 Views

    Very good like always 😉

  • Widget | CSS customization

    Solved WordPress
    53
    17 Votes
    53 Posts
    3k Views

    @Sala the only way you can achieve this is to use a robots.txt file and disallow access to those links.

  • 50 Votes
    146 Posts
    18k Views

    Updated git for above change

    https://github.com/phenomlab/nodebb-harmony-threading/commit/14a4e277521d83d219065ffb14154fd5f5cfac69

  • hover link effect

    Solved Customisation
    18
    6 Votes
    18 Posts
    617 Views

    @DownPW Looking at the underlying code, class start is being added on hover by jQuery in this function

    document.querySelectorAll(".button-gradient, .button-transparent").forEach((button) => { const style = getComputedStyle(button); const lines = document.createElement("div"); lines.classList.add("lines"); const groupTop = document.createElement("div"); const groupBottom = document.createElement("div"); const svg = createSVG( button.offsetWidth, button.offsetHeight, parseInt(style.borderRadius, 10) ); groupTop.appendChild(svg); groupTop.appendChild(svg.cloneNode(true)); groupTop.appendChild(svg.cloneNode(true)); groupTop.appendChild(svg.cloneNode(true)); groupBottom.appendChild(svg.cloneNode(true)); groupBottom.appendChild(svg.cloneNode(true)); groupBottom.appendChild(svg.cloneNode(true)); groupBottom.appendChild(svg.cloneNode(true)); lines.appendChild(groupTop); lines.appendChild(groupBottom); button.appendChild(lines); button.addEventListener("pointerenter", () => { button.classList.add("start"); }); svg.addEventListener("animationend", () => { button.classList.remove("start"); }); }); })

    The CSS for start is below

    .button-gradient.start .lines svg, .button-transparent.start .lines svg { animation: stroke 0.3s linear; }

    And this is the corresponding keyframe

    @keyframes stroke { 30%, 55% { opacity: 1; } 100% { stroke-dashoffset: 5; opacity: 0; } }

    It’s using both CSS and SVG, so might not be a simple affair to replicate without the SVG files.

  • chat list navbar

    Solved Customisation
    30
    3 Votes
    30 Posts
    2k Views

    No no it’s ok @phenomlab
    I just comment the 2 lines mentionned aboves 😉

  • 5 Votes
    3 Posts
    383 Views

    @phenomlab

    I love it too

    @phenomlab said in Blinking text Effect:

    Has that “broken neon light” look that you see in films.

    It’s exactly that, kind of old neon signs of bar or pubs a bit cyberpunk too 😉

  • 3 Votes
    2 Posts
    557 Views

    @pwsincd welcome to sudonix, and thanks for the comments. What your looking for is here

    https://sudonix.com/topic/195/nodebb-welcome-message/3?_=1648295651358

  • 5 Votes
    9 Posts
    2k Views

    @phenomlab

    Very very great Mark 😉
    Thanks again, It’s perfect now !

    –> I share my code that I modified.

    I’ve added French and English comments.
    If you see things to change Mark, don’t hesitate.

    As usual, all the access paths (FA icons, logo) will have to be modified according to your architecture.

    You can also very well add/remove time slots and change welcome messages to suit your needs.

    Widgets ACP/HTML Widget Footer Logo <center> <br><br> <img id="thislogo" src="path/to/my/image"> </center> Widget Welcome Message <!-- IF loggedIn --> <div class="getUsername">, <a href="/me"><span class="username"></span></a></div> <!-- ENDIF loggedIn --> CSS

    – I added the size font-weight: 900; in the CSS because otherwise some FA icon wasn’t displayed correctly and reduce margin :

    i#thisicon { font-family: "Font Awesome 5 Free"; font-style: normal; margin-right: 8px; font-weight: 900; } .getUsername { padding-top: 20px; text-align: right; } /*Smartphone*/ /*On désactive le message de bienvenue"*/ /*We disable the welcome message"*/ @media all and (max-width: 1024px) { .getUsername { display: none; } } JAVASCRIPT // ------------------------------------------ // Welcome Message avec icône et Footer logo // Welcome Message with icon and Footer logo // ------------------------------------------ $(window).on('action:ajaxify.end', function (data) { //On récupère le username dans le DOM et on l'affiche //We retrieve the username from the DOM and display it function updateUsername() { $('.getUsername .username').text(app.user.username); } if (document.readyState === 'loading') { document.addEventListener('DOMContentLoaded', updateUsername); } else { updateUsername(); } //On déclare les variables principales (themessage & thehours) ainsi que les variables secondaires correspondants aux plages horaires //We declare the main variables (themessage & thehours) as well as the secondary variables corresponding to the time slots var thehours = new Date().getHours(); var themessage; var wakeup = ('Good day'); var morning = ('Good morning'); var lunch = ('Bon appétit'); var afternoon = ('Good afternoon'); var drink = ('Cheers'); var evening = ('Good evening'); var night = ('Good night'); var welcome = ('Welcome'); var matched = false; //On peux ici tester le résultat du code en spécifiant une heure (!!!IMPORTANT: Commenter une fois le script testé!!!) //Here we can test the result of the code by specifying a time (!!!IMPORTANT: Comment once the script has been tested!!!) //thehours = 20 //On déclare les plages horaires avec les icones FA et les logos //We declare the time slots with FA icons and logos path if (thehours >= 0 && thehours < 6) { themessage = night; theicon = "fa-solid fa-moon"; thelogo = "/assets/customlogo/XXX.png"; } else if (thehours >= 6 && thehours < 8) { themessage = wakeup; theicon = "fa-solid fa-mug-hot"; thelogo = "/assets/customlogo/XXX.png"; } else if (thehours >= 8 && thehours < 12) { themessage = morning; theicon = "fa-solid fa-sun"; thelogo = "/assets/customlogo/XXX.png"; } else if (thehours >= 12 && thehours < 13) { themessage = lunch; theicon = "fas fa-hamburger"; thelogo = "/assets/customlogo/XXX.png"; } else if (thehours >= 13 && thehours < 16) { themessage = afternoon; theicon = "fa-solid fa-sun"; thelogo = "/assets/customlogo/XXX.png"; } else if (thehours >= 16 && thehours < 18) { themessage = welcome; theicon = "fa-solid fa-rocket"; thelogo = "/assets/customlogo/XXX.png"; } else if (thehours >= 18 && thehours < 19) { themessage = drink; theicon = "fa-solid fa-wine-glass"; thelogo = "/assets/customlogo/XXX.png"; } else if (thehours >= 19 && thehours < 20) { themessage = lunch; theicon = "fas fa-pizza-slice"; thelogo = "/assets/customlogo/XXX.png"; } else if (thehours >= 20 && thehours < 24) { themessage = evening; theicon = "fa-solid fa-tv"; thelogo = "/assets/customlogo/XXX.png"; } // Si la page active est un topic, on désactive/cache le message de bienvenue // If the active page is a topic, we deactivate/hide the welcome message if (window.location.href.indexOf("topic") > -1) { console.log("This is a topic, so hide the user welcome message"); $('#thisuser').hide(); } // Sinon, on affiche le message en fonction, l'icone FA et son emplacement (prepend) // Otherwise, we display the message in function, the FA icon and its location (prepend) else { $('.getUsername').prepend("<i id='thisicon' class='" + theicon + "'></i>" + themessage); $("#thislogo").attr("src", thelogo); //$('.getUsername').prepend("<img id='thisicon' src='" + thelogo + "'></>" + themessage); } });