Use this code
git fetch # Grab the latest code from the NodeBB repository git checkout v3.x git reset --hard origin/v3.xAnd you will have the latest version without specifying it
https://docs.nodebb.org/configuring/upgrade/
@phenomlab permission for user right? so i did not change any permison for nodebb user so why it caused or what i should do for to give permision to nodebb user? till 2.8.2 nodebb user can upgrade any permission case what happened with 2.8.4 ")
@cagatay are you able to remove that plugin and reinstall or does it present the same error?
@phenomlab yeap i removed the plugin and reinstall it problem is fixed.
@phenomlab i deleted emoji plugin but while upgraded to 2.8.6 faced same problem.
cant understand whats going on.
@cagatay can you provide the logs?
@cagatay does it work if you remove this plugin, perform the upgrade, and then put it back afterwards?
@phenomlab i removed the plugin then upgraded but faced same eror…
Maybe reset permissions on all nodebb directory like this ?
chown -R yournodebbuser:yournodebbuser /home/youruser/yournodebbdirectory
chown -R nodes:nodes /home/nodes/nodebb
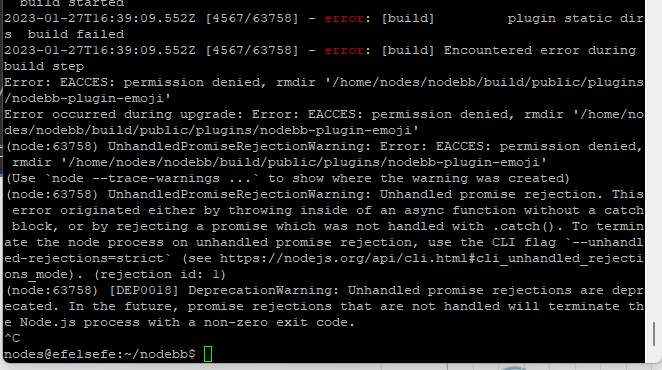
because I see permissions error on /home/nodes/nodebb/builds/.... in the last screenshot
And .upgrade and or rebuild nodebb
??
@DownPW yes, but we really need to understand why and how these permissions are changing.
@DownPW @cagatay I found the reason why. This plugin is in fact faulty. I installed it myself because I wanted to add that feature to Sudonix. Not only does it push socket.io through the roof (and adds at least 2 seconds lag to each transaction)
It also is impossible to remove by using the GUI - see my experience below, which is exactly the same as @cagatay
Not great. The only way to remove this cleanly is from the CLI
npm remove @nodebb/nodebb-plugin-reactions
./nodebb build
./nodebb restart
I remember flagging this a while back - it’s here
https://github.com/NodeBB/NodeBB/issues/10582
And here (one I raised)
https://github.com/NodeBB-Community/nodebb-plugin-reactions/issues/8
So, my advice is NOT to use this plugin currently as the unnecessary load it places on your forum isn’t worth the functionality it provides.
@phenomlab i dont have this plugin Mark. So the problem is currently continue.
@cagatay Sorry - my mistake.
@phenomlab not fixed yet.
@cagatay are you installing this plugin as root, or as the user running NodeBB?
@phenomlab as user.
as a root i dont want to use for Nodebb.
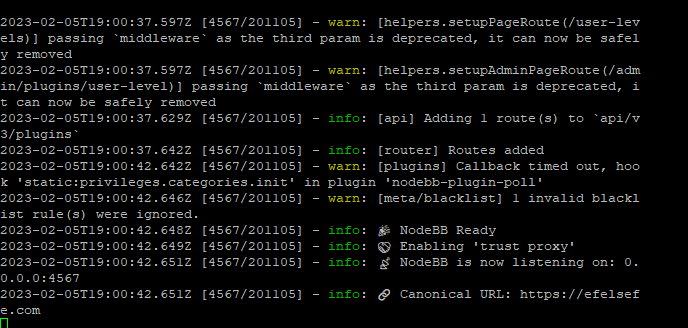
on the other hand the forum is working normally. it is happening just when i m upgrading.
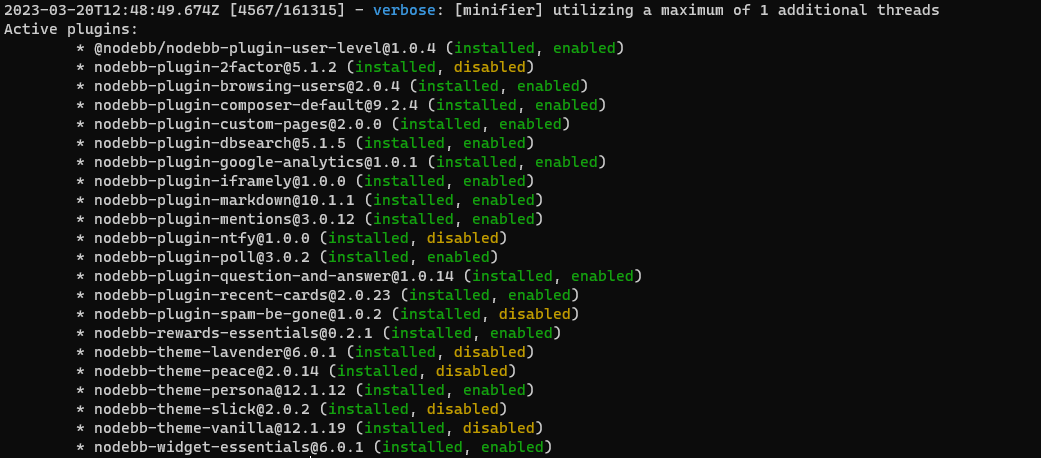
@cagatay I’m not able to replicate this issue within my test environment. What permissions are set for the file and folders on this specific plugin?
@phenomlab its not problem as for the this moment. lets forget about it.
we should focus on v3
@cagatay I can work with that 
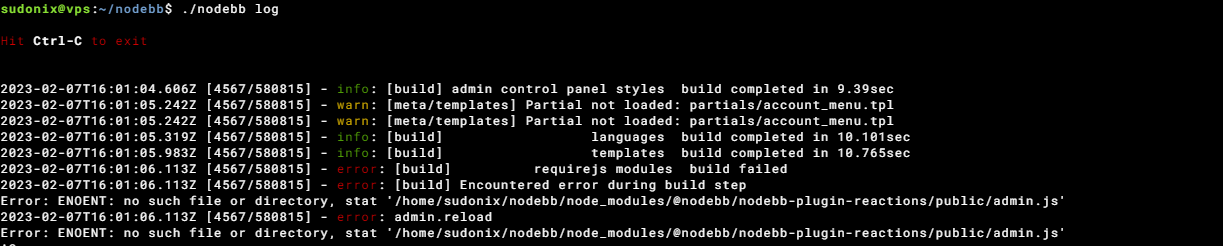
You are getting that message because you have the three plugins below installed which all depend on nodebb-plugin-emoji so you cannot remove the main plugin without first removing those

I’ve done it for you anyway
You should be able to upgrade now.